
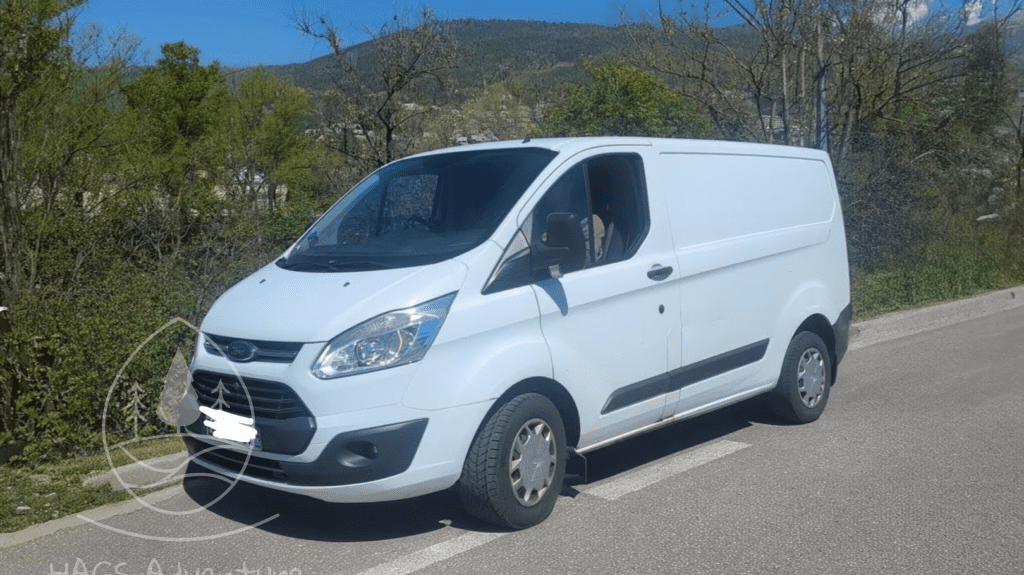
Buy a converted van, It was a desire... but with constraints.
With all the work that had to be done on the house and the budget, it was impossible to opt for an overpriced fully-equipped model. The objective was clear: to find a used van, simple, accessible and scalable.
In this article, I share everything with you: the model we bought, its actual state, the problems we've discovered, the repairs, and above all what we plan to do with it.
Because a van under €10,000, It's never perfect. But well chosen, it can become a real basis for travelling differently.
*Le Roule Merry: that's the name we've given to our little van ❣️
Which van did we buy?
Originally, buying a van was clearly in the back of my mind... but not to the extent of spending all our weekends visiting.
Simon, on the other hand, saw things even more simply: crossing France to see a vehicle was out of the question. So the rule was clear from the start: it would be close to home, or nothing at all.
The same logic applied to the budget. We didn't want to blow up the accounts. The aim was to stay within a reasonable envelope, around 12 000 à 15 000 €.
As a result, we weren't even really actively looking. We were more in passive standby, It's just something to look at from time to time, without any pressure. And as is often the case... that's when it happens: one day, completely by chance, while scrolling through Facebook, I come across an advert. A van in Embrun, So it's literally next door. Size-wise, it's a good match. In terms of mileage too. And above all: the price is consistent with what we had set ourselves.
We look at each other and say “well... we'll at least go and see him”.
Spoiler: we didn't leave empty-handed.
The model we bought : 2017 Ford Transit Custom
A choice that, on paper, ticks all the boxes:
- utility van compact but usable for sleeping two,
- discreet look perfect for going unnoticed,
- common model so it's easy to maintain,
- excellent basis for a van fitting simple and scalable without blowing your budget
We didn't set out with an ultra-precise idea of the model. No fantasy of converted van à 50 000 €. Just something simple, reliable and functional.
And in the end, that's exactly what we found.
What condition is the van in when you buy it?
We are on a used van 2017, which means a vehicle that has already been driven well with 200,000 km on the clock.
Clearly, it's not a “like new” van. But that wasn't the objective at all.
What interested us most was the mechanical condition. And from that point of view, the signals were pretty good:
- timing belt already replaced,
- clutch changed,
- global follow-up interview
These are major items of expenditure, so the fact that they've already been done makes the purchase much more secure.
Another key point is price.
We managed to buy it for less than €10,000, This is clearly below the budget we had set ourselves.
As a result, we retain a real margin for the’van layout and any unforeseen circumstances. And that's far from being a detail when you set out on a project like this.
At this stage, you think you've made a good deal.
But that was before I dug a little deeper...
Bodywork problems and water ingress
Once we'd got the van back, we started looking in more detail. And that's when we discover something we hadn't identified at all during the visit: a problem with the van roof.
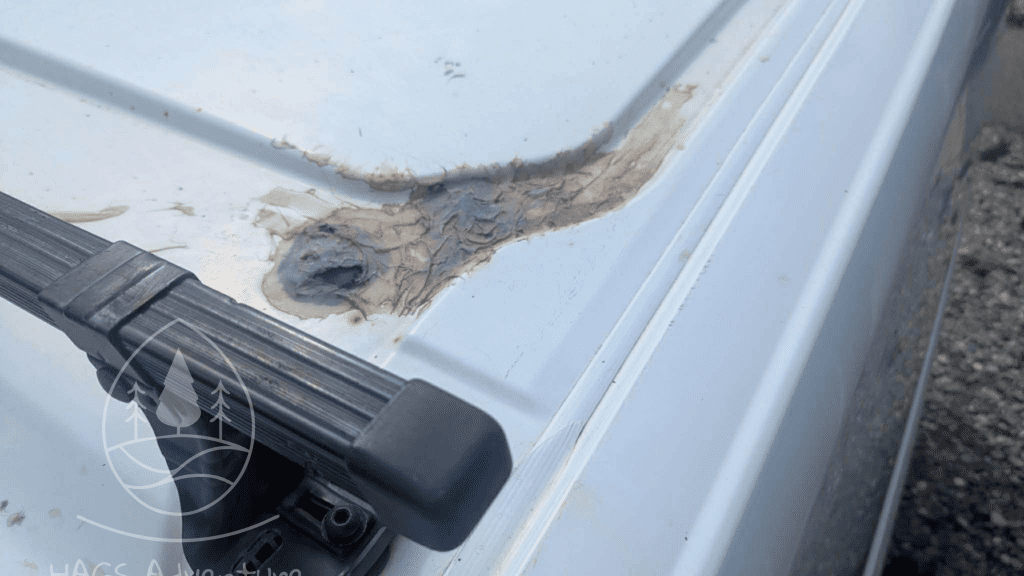
In reality, there were two sources of water infiltration :
- a makeshift repair to the bodywork,
- from non-waterproof roof racks
The repair visible from the outside was made using incorrectly applied silicone, which clearly wasn't doing its job. It was enough to pass quickly unnoticed... but not enough to provide adequate protection.
Inevitably, when you see this, you start to have doubts: what's going on underneath?
So we decided to dismantle the ceiling of the van, which was part of a removable fittings already installed.
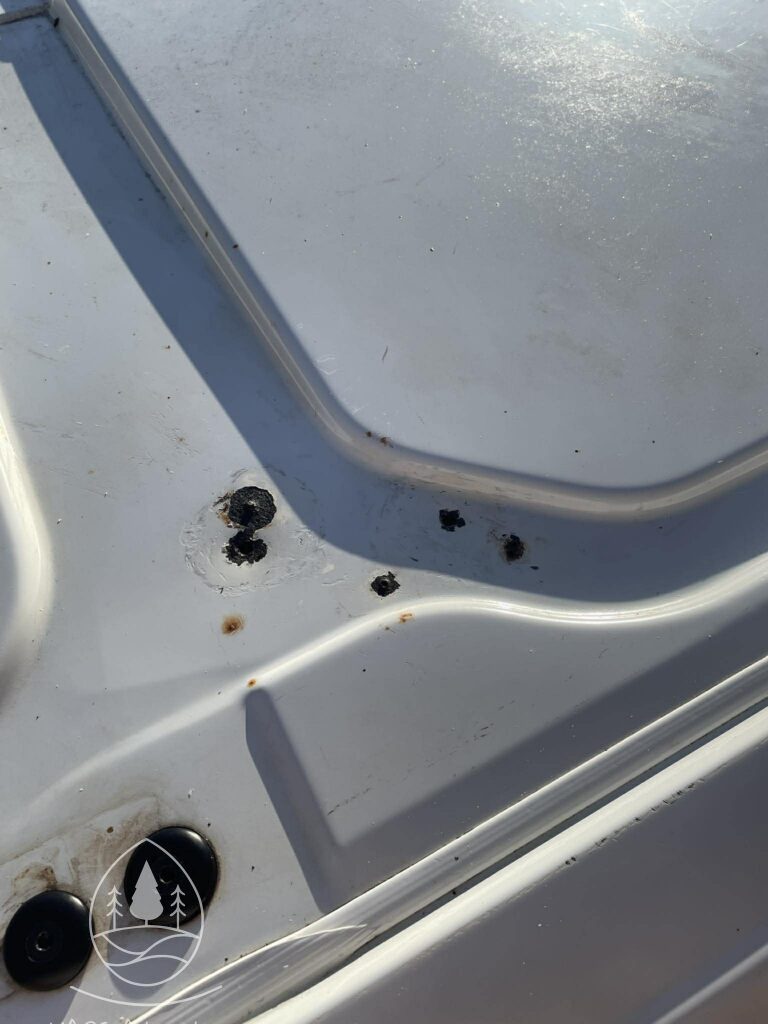
And there's no surprise here: we're discovering rust on the interior bodywork, proof that’water ingress is very real and has been present for some time.
Complete bodywork repair
Rather than simply cover it up, Simon decided to take it from start to finish.
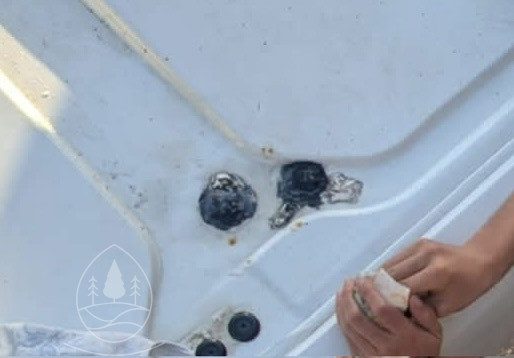
First step: completely remove the existing structure.
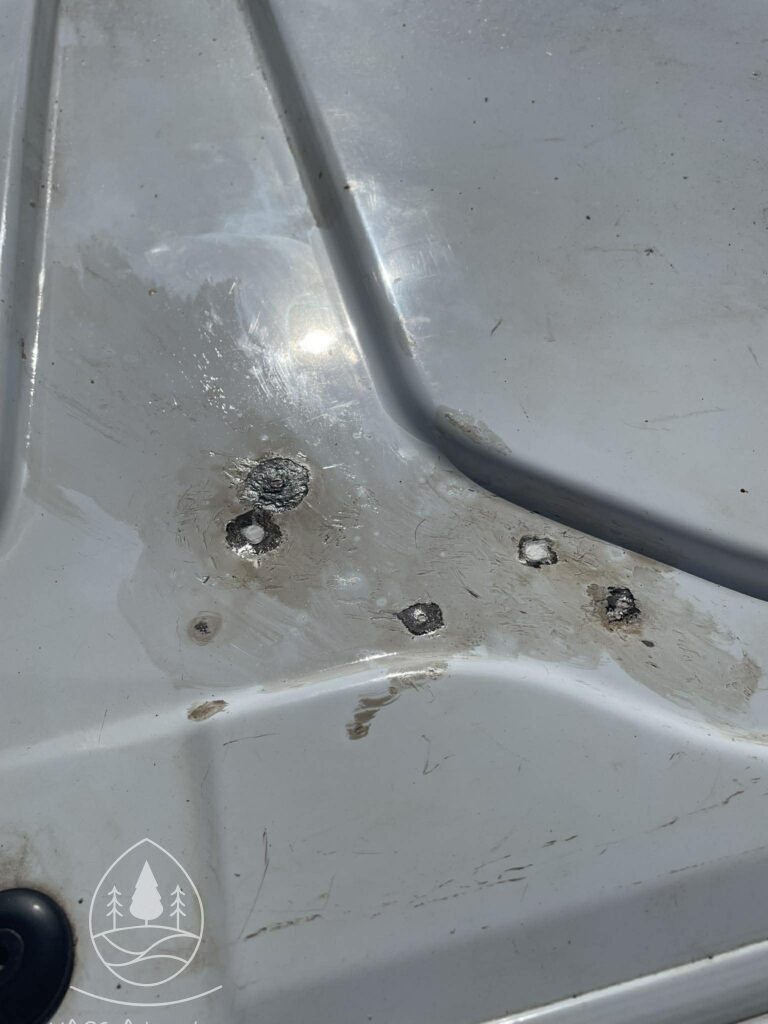
- complete withdrawal of defective silicone,
- dismantling the components that passed through the sheet metal (in particular certain screws),
- exposing the damaged area
Once the area is clean, you'll discover several small holes in sheet metal, These are probably linked to the old installation and corrosion.
Then, in-depth treatment:
- sanding off rust to get back on a sound footing,
- application of a anti-rust treatment,
- filling in areas with silicone seal to ensure an initial seal
Then comes the finishing phase:
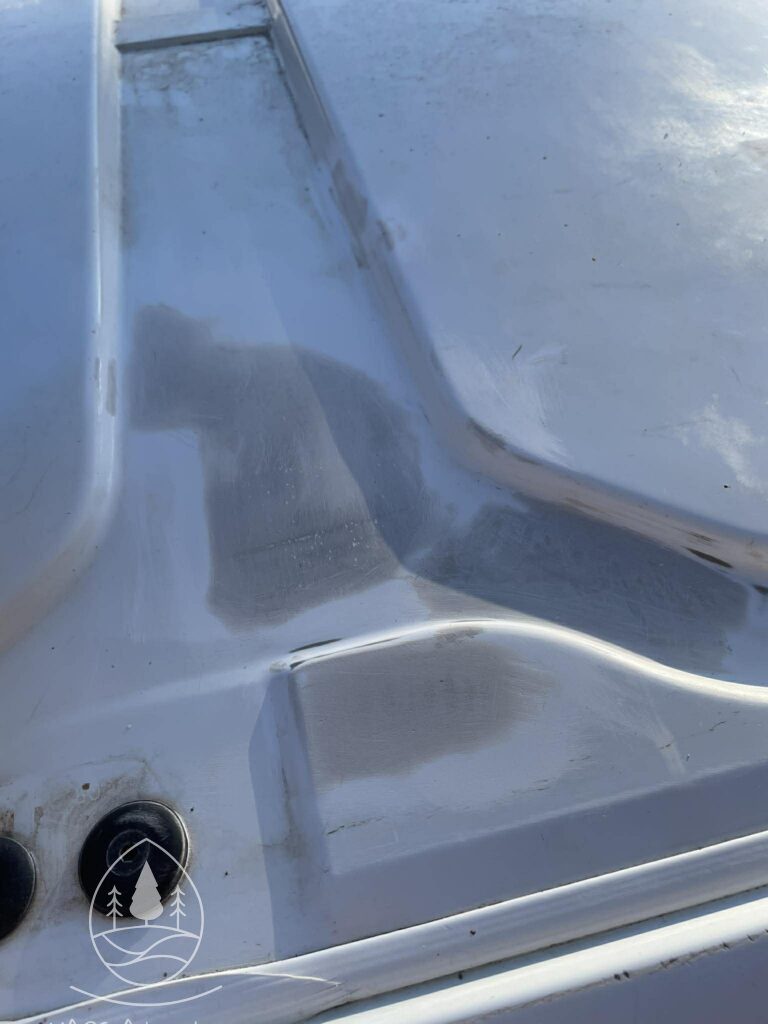
- application of a special bodywork coating to smooth and solidify the repair,
- sanding for a clean surface,
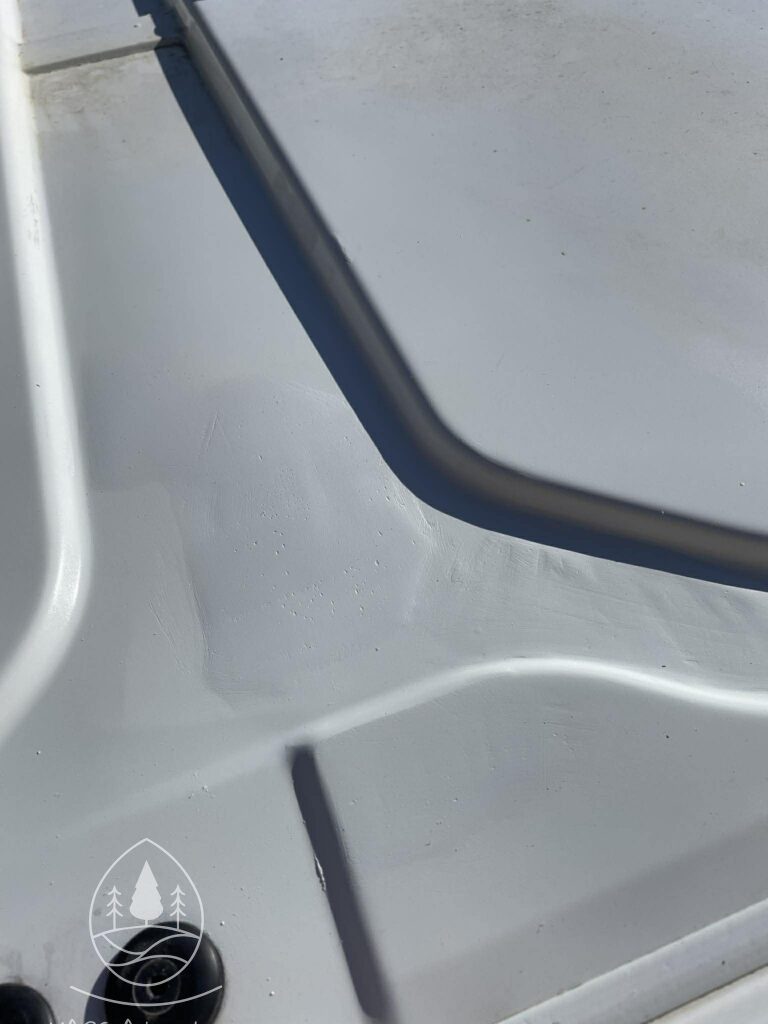
- three coats of paint to achieve a uniform appearance with the rest of the van
The result: a clean, watertight and, above all, long-lasting repair.
And while we were at it, Simon took the opportunity to give the vehicle a full tour:
- treatment of secondary rust spots,
- correction of minor bodywork scratches
In the end, even if this part wasn't planned at the outset, it enabled us to get back on a sound footing.
And in a converted van, It's clearly essential.
Van interior layout: simple but functional
Inside, we're on a basic van fittings, It's clearly designed to be functional before it's aesthetic.
There are three main elements:
- a comb bed,
- a side storage unit,
- a cabinet with drawers at the front of the van
The whole thing is simple, but immediately usable. You don't need to rebuild the whole thing to go on a roadtrip.
Another good point: the entire electricity for the van is already in place, On paper, it does the job. On paper, it does the job.
But in reality, there are several limits.
From a visual point of view, you can tell that the layout has been put together quickly. The finishes are basic:
- some areas are not covered
- the wooden planks are rough,
- l’wood wool insulation is visible in places,
Even if the wood wool is a natural material and there are no particular risks identified here, it's clearly not pleasant on a daily basis. Neither to the touch, nor visually.
Another point: the the van's interior bodywork is still visible in several places. And as the vehicle was used as a’utility, :
- brands,
- shocks,
- damaged areas
It's not dramatic, but it reinforces the “rough” feel of the whole thing.
Finally, there is also a subject on cleanliness.
Some areas are simply inaccessible to cleaning without completely dismantling the fittings. The result: you can see that there's a lot of embedded dirt, particularly in the corners and behind the furniture.
Conclusion: the current layout is practical, but clearly not satisfactory in the long term.
It allows us to leave straight away, but we already know that we're going to take it back to get something cleaner, more comfortable and above all more consistent with the use we want to make of it.
What we plan to do on the van
The first step is simple: head for the garage.
Le technical inspection of the van mentions a few minor repairs. Nothing alarming, but we prefer not to let them linger. The idea is to get back on a clean mechanical footing before starting anything.
Secondly, we're not going to rush into the work.
We plan to leave in road trip with the van as is, with the’current layout, to test under real conditions. This is a key stage, because on paper, everything always seems logical... but in practice, it's often a different story.
The objective is clear: validate or reject our design ideas based on what we're actually experiencing on the ground.
What changes are planned?
Once this test phase is over, we already have a good vision of possible developments.
The first essential step is to take everything apart.
We want to start again with something clean, so :
- complete removal of the fittings,
- in-depth cleaning,
- treatment of visible areas of rust under the wood wool
These areas are most likely linked to the ancient water seepage from the van, It's not condensation. The aim is therefore to ensuring the long-term future of the bodywork first and foremost.
Then there's the question of insulation.
We plan to switch to a Armaflex insulation, more homogeneous and visually cleaner. But this remains to be confirmed after use, depending in particular on our real need for thermal comfort.
Interior cladding: a warm, clean objective
Today, the interior is unfinished. The idea is to make the whole thing more pleasant, without going for a complex layout.
For the floor, two options are being considered PVC tiles or a made-to-measure wooden base with a lino flooring. In all cases, we will start with a vinyl flooring, which is easier to maintain and more suitable for van use.
For the walls, the idea is quite clear: lay wall felt. It's a solution aesthetics, quick to fit, inexpensive, for a warmer look. It can be laid directly on the’Armaflex or current insulation.
The only drawback is its fragility. If you're using the van for utility purposes, you'll need to protect it with cardboard to avoid damaging the surfaces.
The ceiling is still under consideration.
One approach: use wood panelling, including available renovation leftovers. The idea would be to mix :
- grey (felt)
- wood (ceiling)
- white (existing elements)
The aim is to recreate a home-like atmosphere, with a warm, consistent finish.
Layout and sleeping arrangements: a major area of development
When it comes to furnishings, not everything will have to be redone.
Le existing drawer unit could be preserved, with sanding, repainting and possibly the replacement of a plank.
The real issue, however, is sleeping.
Today, we're on a 130 cm comb bed. And clearly, it's too small. 140 cm is just about right for us. It's even the point that could make us regret the roof tent if we don't improve it.
Two options are being considered:
- improve existing comb bed to make it run more smoothly (it currently blocks a little when it opens),
- or switch to a BZ system adapted to the van, for greater width and comfort
The idea would also be to optimise the space underneath, in particular with a drawer accessible from the rear.
Reorganisation of the kitchen
At present, the kitchen is positioned at the front, in a drawer.
It's not ideal for the use I'm planning with a mosquito net.
The aim is to move it to the back of the van, with :
- a furniture accessible through the rear doors,
- a external shelf to install the stove
This would allow you to cook outside, more comfortably, without taking up space inside.
Using the van: towards 4-season use?
Today, our usage is based on that of the roof tent mainly from April to September / October.
But the aim with the van is to go further. We'd like to be able to use it in 4-season van, in particular for :
- from winter road trips,
- from Christmas markets in the north-east,
- events such as the Cannes Game Festival in February.
Insulation alone will probably not be enough. You'll need to consider heating for van, So you can sleep comfortably even when the temperature drops.
The idea is clearly to move away from the Airbnb model as soon as possible and gain greater freedom all year round.
Conclusion
Overall, the van is in a condition commensurate with its price.
We knew we were buying a used van with work, and it's confirmed. But nothing inconsistent or worrying.
The shortcomings identified are part of the project, and they are more than compensated for by the purchase price, which leaves us plenty of scope to develop the layout.
The priority now is to test the van in real-life conditions, to avoid making the wrong choices.
Only then will we move on to a phase of complete cleaning and interior renovation, with a much clearer vision of what we really need.